Limit Download-Speed with CodeIgniter and cURL
Many websites, especially download portals, are known for limiting the speed with which files can be downloaded (sometimes to a very significant extent). The business model is generally based on the concept that you can only get the full download speed if you pay for it.
In this tutorial, I want to show you what’s behind this limitation, and the software tricks these providers are using. I’m also going to show you how to integrate an option to limit download speed into a CodeIgniter project here.
CURL AS THE CORE OF THE APPLICATION
When we talk about cURL, we are talking about a widely used command line application that is specifically designed to transfer data within computer networks. The advantage is in how easy it is to use, because the program library has been ported to essentially all operating systems. In addition, it also has a vast range of functions.
Unlike its older predecessor “wget”, cURL controls not only the downloading, but also the uploading of files. Numerous parameters provide a correspondingly large number of options, thereby covering nearly every scenario.
SETUP WITH CODEIGNITER
Now we’ve arrived at the essential part of this tutorial: the integration of speed limitation in a CodeIgniter project.
![]()
STEP 1: BUILD THE BASIC SYSTEM
In order to start our project, we first have to establish a basis on which we can subsequently build. In order to do so, we need to download the latest version of the framework from the CodeIgniter homepage. In this case, this would be version 3.1.5.
Next copy all the files – ideally to the subfolder “ci-downloadspeed” – onto the webserver (e.g. XAMPP, LAMP, etc.), and open its root directory in your browser, e.g., http://localhost/ci-downloadspeed/. Once all of the requirements for the framework are met, you should then see the CodeIgniter welcome page.
In order to ensure that the speaking URLs can also be accessed correctly, create an .htaccess file with the following content:
RewriteEngine on

RewriteRule ^(assets|downloads)($|/) - [L]
RewriteRule .* index.php
All of the resources needed for the actual application (CSS and JS files) are created in the “assets” directory, and the sample download files will later be created in the “downloads” directory (information about this can be found in the “Conclusion” section).
Next, open /application/config/autoload.php (the autoloader configuration file) and then add the URL helper. This way, we will be able to use the base_url() function both in the frontend and this time, even within the application itself.
$autoload['helper'] = array('url');
In /application/config/routes.php (the route configuration file), we then need to change the default controller from “welcome” to “home”, since we want our speed throttling application to be loaded by default later.
$route['default_controller'] = 'home';
$route['404_override'] = '';
$route['translate_uri_dashes'] = FALSE;
STEP 2: DEFINE THE BASIC LAYOUT
In order to do so, navigate to /application/controller and create a file named Home.php (case-sensitive!).
Next, we need to create the basic framework for our application in this file, which consists of two actions: one for the index page and one for the throttled file downloads. The latter will receive parameters for the type of download (in our example, the parameter will only distinguish between a small file and a large file), as well as parameters for the download speed itself (in KB/s).
<?php
defined('BASEPATH') OR exit('No direct script access allowed');

class Home extends CI_Controller
{


	public function index()
	{

	}


	public function download($type = 1, $speed_kbs = 64)
	{

	}

}
In this case, the index action is very rudimentary, since it has no functionality on its own. It is only being used to display the main page of our application:
public function index()
{
	// load view
	$this->load->view('home');
}
Now let’s look at the HTML layout in the linked view.
<?php defined('BASEPATH') OR exit('No direct script access allowed'); ?>
<!DOCTYPE html>
<html lang="en" xmlns="http://www.w3.org/1999/html">
<head>
    <meta charset="utf-8">
    <meta http-equiv="X-UA-Compatible" content="IE=edge">
    <meta name="viewport" content="width=device-width, initial-scale=1">
    <meta name="description" content="">
    <meta name="author" content="">

    <title>CI Download-Speed</title>

    <!-- Latest compiled and minified CSS -->
    <link rel="stylesheet" href="https://maxcdn.bootstrapcdn.com/bootstrap/3.3.7/css/bootstrap.min.css"
          integrity="sha384-BVYiiSIFeK1dGmJRAkycuHAHRg32OmUcww7on3RYdg4Va+PmSTsz/K68vbdEjh4u" crossorigin="anonymous">

    <!-- Custom CSS for basic styling -->
    <link rel="stylesheet" href="<?php echo base_url(); ?>assets/css/style.css"/>

    <!-- Optional CSS for individual theming (powered by Bootswatch - https://bootswatch.com/) -->
    <link rel="stylesheet" href="<?php echo base_url(); ?>assets/css/bootstrap_flatly.min.css"/>

    <!-- HTML5 shim and Respond.js for IE8 support of HTML5 elements and media queries -->
    <!--[if lt IE 9]>
    <script src="https://oss.maxcdn.com/html5shiv/3.7.3/html5shiv.min.js"></script>
    <script src="https://oss.maxcdn.com/respond/1.4.2/respond.min.js"></script>
    <![endif]-->
</head>
<body>

<nav class="navbar navbar-default navbar-fixed-top">
    <div class="container">
        <div class="navbar-header">
            <button type="button" class="navbar-toggle collapsed" data-toggle="collapse" data-target="#navbar"
                    aria-expanded="false" aria-controls="navbar">
                <span class="sr-only">Toggle navigation</span>
                <span class="icon-bar"></span>
                <span class="icon-bar"></span>
                <span class="icon-bar"></span>
            </button>
            <a class="navbar-brand" href="#">CodeIgniter Download-Speed</a>
        </div>
        <div id="navbar" class="collapse navbar-collapse">
            <ul class="nav navbar-nav">
                <li class="active"><a href="<?php echo base_url(); ?>">Home</a></li>
                <li><a href="#about">About</a></li>
                <li><a href="#contact">Contact</a></li>
            </ul>
        </div>
    </div>
</nav>

<div class="container">

    <div class="intro">
        <h1>Choose your download speed!</h1>
        <p class="lead">
            Lorem ipsum dolor sit amet, consetetur sadipscing elitr, <br/>
            sed diam nonumy eirmod tempor invidunt ut labore et dolore magna aliquyam erat, <br/>
            sed diam voluptua.
        </p>

        Here will be our core application...


    </div>

</div>


<!-- Bootstrap core JavaScript
================================================== -->
<!-- Placed at the end of the document so the pages load faster -->
<script  src="https://code.jquery.com/jquery-3.2.1.min.js"
        integrity="sha256-hwg4gsxgFZhOsEEamdOYGBf13FyQuiTwlAQgxVSNgt4=" crossorigin="anonymous"></script>
<script  src="https://maxcdn.bootstrapcdn.com/bootstrap/3.3.7/js/bootstrap.min.js"
        integrity="sha384-Tc5IQib027qvyjSMfHjOMaLkfuWVxZxUPnCJA7l2mCWNIpG9mGCD8wGNIcPD7Txa"
        crossorigin="anonymous"></script>
<script  src="<?php echo base_url(); ?>assets/js/app.js"></script>
</body>
</html>
What we have created here is a basic layout with a navigation bar and a simple block of text with a heading.
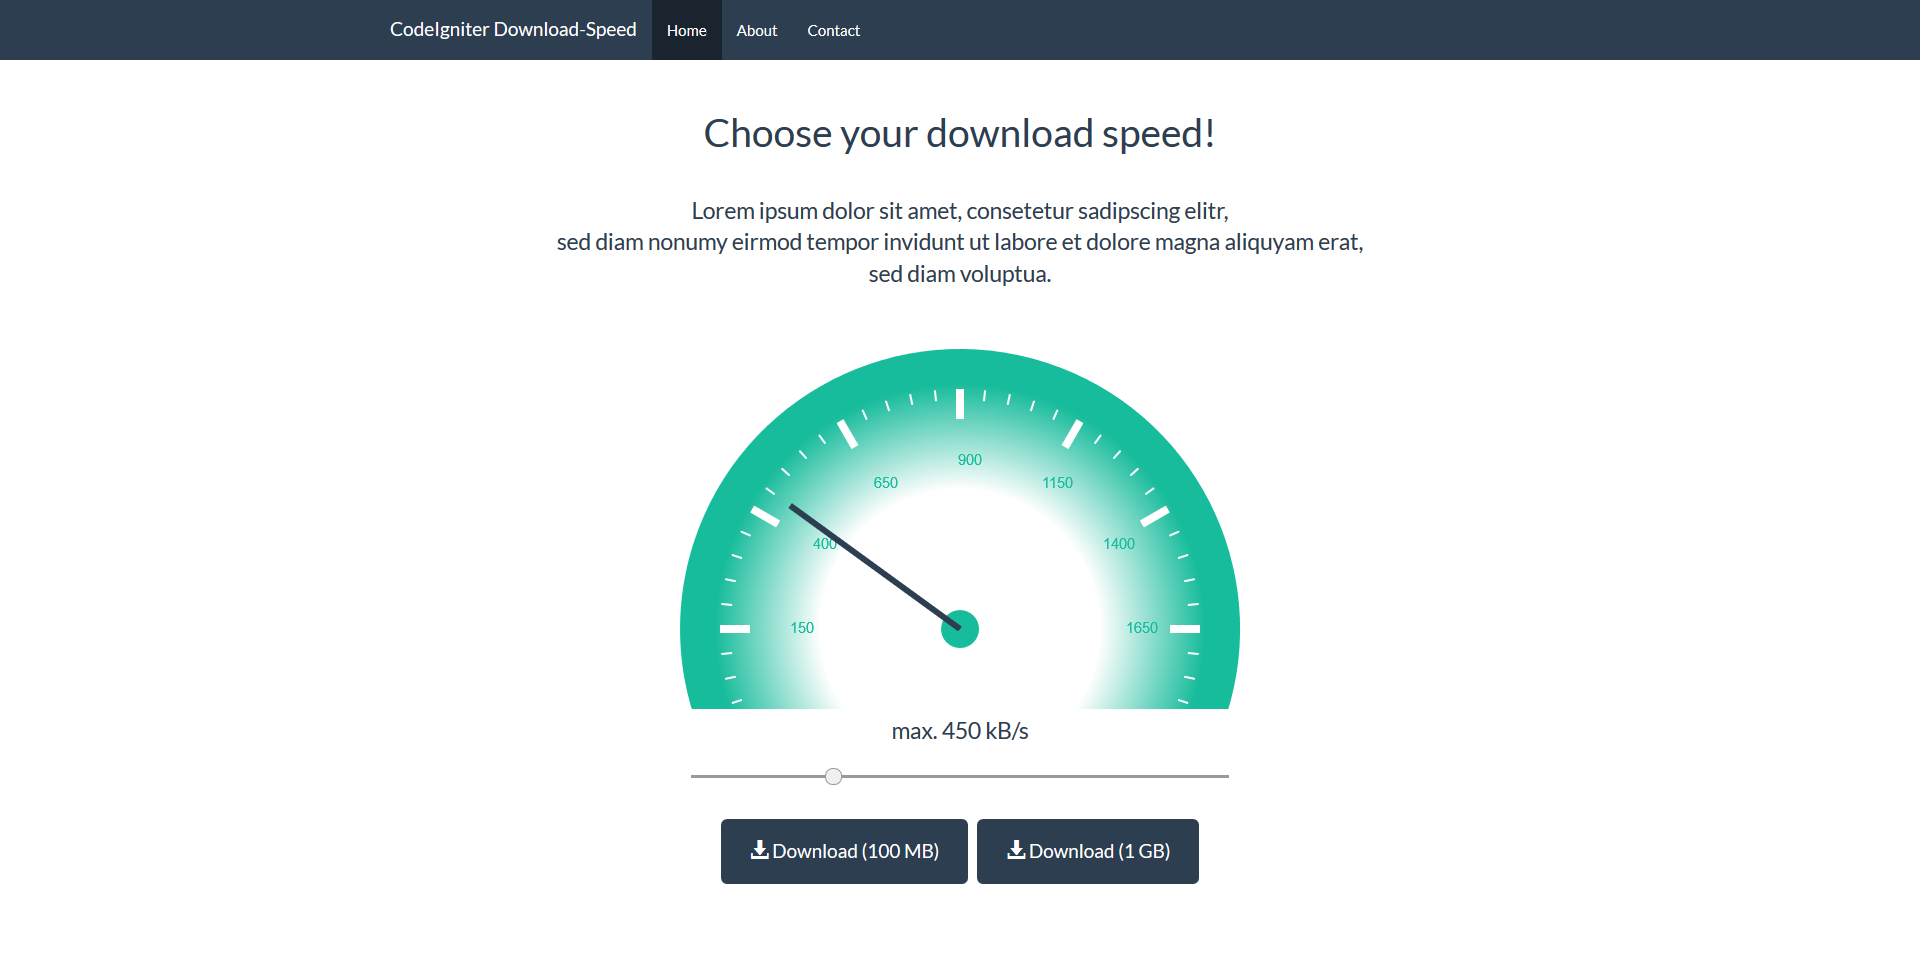
Directly underneath it (where it currently still reads “Here will be…”) is the markup for our application: a speed meter, which we will configure based on the “HTML5 Canvas Speedometer”. In addition, there are two download buttons (one for a smaller file, and one for a larger file):
<canvas class="canvas" id="myCanvas" width="600" height="400">
Your browser does not support the HTML5 canvas tag.
</canvas>
<div class="row">
<div class="col-md-6 col-md-offset-3">
<div id="slider">
<p class="lead">max. <span id="selectedSpeed"></span> kB/s</p>
<input style="width:100%" id="slide" type="range" min="0" max="1750" step="50" value="100"/>
</div>
</div>
</div>
<p> </p>
<p>
<a href="#" class="btn btn-primary btn-lg start-download"
data-url="<?php echo base_url(); ?>home/download/1/###speed###">
<span class="glyphicon glyphicon-download-alt" aria-hidden="true"></span> Download (100 MB)
</a>
<a href="#" class="btn btn-primary btn-lg start-download"
data-url="<?php echo base_url(); ?>home/download/2/###speed###">
<span class="glyphicon glyphicon-download-alt" aria-hidden="true"></span> Download (1 GB)
</a>
</p>
The linked bootstrap_flatly.min.css file is the free “Flatly” Bootstrap theme from Bootswatch.
This CSS theme is optional and can therefore be omitted if you prefer.
We will define a couple of basic styles in the style.css file:
body {
	padding-top: 50px;
}
.intro {
	padding: 40px 15px;
	text-align: center;
}

.intro h1 {
	margin-bottom: 40px;
}
The logic for the frontend of our application belongs in the linked app.js file.
// Based on:  http://www.knowstack.com/html5-canvas-speedometer/

$(document).ready(function(){

    var draw = function(speed)
    {
        var  canvas = document.getElementById("myCanvas");
        var  context = canvas.getContext("2d");
        context.clearRect(0,0,canvas.width, canvas.height);
        var centerX = canvas.width / 2;
        var centerY = (canvas.height / 5) * 4;
        var radius = canvas.width / 2 - 20;

        context.beginPath();
        context.arc(centerX, centerY, radius, Math.PI*0.10, Math.PI*-1.1, true);

        var gradience = context.createRadialGradient(centerX, centerY, radius-radius/2, centerX, centerY, radius-radius/8);
        gradience.addColorStop(0, '#ffffff');
        gradience.addColorStop(1, '#18bc9c');

        context.fillStyle = gradience;
        context.fill();
        context.closePath();
        context.restore();

        context.beginPath();
        context.strokeStyle = '#ffffff';
        context.translate(centerX,centerY);
        var increment = 50;
        context.font="15px Helvetica";
        for (var i=-18; i<=18; i++)
        {
            angle = Math.PI/30*i;
            sineAngle = Math.sin(angle);
            cosAngle = -Math.cos(angle);

            if (i % 5 == 0) {
                context.lineWidth = 8;
                iPointX = sineAngle *(radius -radius/4);
                iPointY = cosAngle *(radius -radius/4);
                oPointX = sineAngle *(radius -radius/7);
                oPointY = cosAngle *(radius -radius/7);

                wPointX = sineAngle *(radius -radius/2.5);
                wPointY = cosAngle *(radius -radius/2.5);
                context.fillText((i+18)*increment,wPointX-2,wPointY+4);
            }
            else
            {
                context.lineWidth = 2;
                iPointX = sineAngle *(radius -radius/5.5);
                iPointY = cosAngle *(radius -radius/5.5);
                oPointX = sineAngle *(radius -radius/7);
                oPointY = cosAngle *(radius -radius/7);
            }
            context.beginPath();
            context.moveTo(iPointX,iPointY);
            context.lineTo(oPointX,oPointY);
            context.stroke();
            context.closePath();

        }

        var numOfSegments = speed/increment;
        numOfSegments = numOfSegments -18;
        angle = Math.PI/30*numOfSegments;
        sineAngle = Math.sin(angle);
        cosAngle = -Math.cos(angle);
        pointX = sineAngle *(3/4*radius);
        pointY = cosAngle *(3/4*radius);

        context.beginPath();
        context.strokeStyle = '#2c3e50';
        context.arc(0, 0, 19, 0, 2*Math.PI, true);
        context.fill();
        context.closePath();

        context.beginPath();
        context.lineWidth=6;

        context.moveTo(0,0);
        context.lineTo(pointX,pointY);

        context.stroke();
        context.closePath();
        context.restore();
        context.translate(-centerX,-centerY);
    };


    // TODO: add listener for range-field and function for setting the selected speed

});
This takes care of the graphical canvas rendering of the speed meter. We now expand this file to include our actual functions (important: it is essential that you write where “TODO: add listener…” is currently located within the “document.ready()” block!). There you will find, among other things, the central function used to set the selected download speed (“setSpeed()“) and a listener, which will react to the range input field. In due course, the listener will transfer the selected value into the speed meter, and will dynamically adjust our two download links.
var setSpeed = function(speed)
{
    // prevent a speed of zero
    if( speed == 0 ){
        speed = 1;
    }

    // draw speedmeter graphic
    draw(speed);

    // write text under speedmeter graphic
    $('#selectedSpeed').text(speed);

    // set individual download url with dynamically speed assignment
    $('a.start-download').each(function(i, v){
        var url = $(v).data('url');
        url = url.replace('###speed###', speed);

        $(v).attr('href', url);
    });
};


// set inital speed
setSpeed(100);


// check for change of speed value while dragging
$(document).on('input change', '#slide', function() {
    setSpeed( $(this).val() );
});
Because the listener will dynamically adjust both download links, we didn’t set the link target for the two download buttons directly, but instead just set it via a data attribute using a placeholder for the actual speed. In this way, we can use the attribute as a template, and we can keep setting the link target dynamically. Initially, we set the download speed to 100 KB/s. This is the default setting that a user gets when they open our application.
STEP 3: INTEGRATING LIMITATION
To integrate speed limitation, we now need our download action, the structure of which we have already created.
public function download($type = 1, $speed_kbs = 64)
{
	// detect, which example file should be used
	if ($type == 2) {
		$filename = '1000mb.bin';
	} else {
		$filename = '100mb.bin';
	}

	// build up public URL for file (for public access via cURL)
	$public_filename = base_url() . 'downloads/' . $filename;

	// build up internal URL for file (for internal access, like filesize())
	$local_filename = FCPATH . 'downloads/' . $filename;


	// get speed in Bytes/s
	$speed = $speed_kbs * 1000;

	// prepare headers for forcing file download
	header('Content-Type: application/octet-stream');
	header('Content-Length: ' . filesize($local_filename));
	header('Content-Disposition: attachment; filename="' . basename($filename) . '"');


	// TODO: get file and provide it as streamed download (with speed limitation)
}
In our example, we first check in this download action whether the large or the small sample file is being loaded. Once this check has been performed, we build the public URL (with domain or IP, depending on the configuration) and the internal URL (absolute path on the server). At the same time, we calculate our download speed by converting the KB/s into bytes/s (using a factor of 1000).
We subsequently define the PHP header for a file download. In order to do so, we simply use “application/octet-stream” as a “content type” so that the download is always forced and the browser doesn’t try to open or display the file itself. Moreover, information regarding the size of the file now (optionally) follows so that the browser is able to detect and display the progress of the download. The name of the file itself comes at the end.
The actual download then follows. We use cURL for this, and we set its parameters as follows:
// init cURL
$ch = curl_init();

// read file from public URL
curl_setopt($ch, CURLOPT_URL, $public_filename);
curl_setopt($ch, CURLOPT_RETURNTRANSFER, true);
curl_setopt($ch, CURLOPT_CONNECTTIMEOUT, 500);

// limit download speed (in bytes per second)
curl_setopt($ch, CURLOPT_MAX_RECV_SPEED_LARGE, $speed);

// stream data in realtime, instead of locally download before finally delivery
curl_setopt($ch, CURLOPT_WRITEFUNCTION, function ($curl, $data) {
	echo $data;
	return strlen($data);
});

// perform "cURL-query"
curl_exec($ch);

// close cURL session
curl_close($ch);
These are essentially mostly standard parameters with two exceptions: CURLOPT_MAX_RECV_SPEED_LARGE and CURLOPT_WRITEFUNCTION.
The CURLOPT_MAX_RECV_SPEED_LARGE option allows us to determine the maximum download speed with which the cURL library reads the data. The task here is in bytes/s, which is the reason for our previous conversion. If the value “0” is specified, there is no throttling and the download is performed with no limits on the speed. The actual speed thus depends more on external factors such as the internet connection itself.
We indicate our own output handler using CURLOPT_WRITEFUNCTION so that the data being read by cURL can also be streamed directly to the user, and not loaded locally onto the server for minutes (or even hours, depending on the speed!) first, before it is delivered. This ensures that the content received is forwarded to the user 1:1 in real time.
To summarize, our download action now appears as follows:
public function download($type = 1, $speed_kbs = 64)
{
	// detect, which example file should be used
	if ($type == 2) {
		$filename = '1000mb.bin';
	} else {
		$filename = '100mb.bin';
	}

	// build up public URL for file (for public access via cURL)
	$public_filename = base_url() . 'downloads/' . $filename;

	// build up internal URL for file (for internal access, like filesize())
	$local_filename = FCPATH . 'downloads/' . $filename;


	// get speed in KB/s
	$speed = $speed_kbs * 1000;

	// prepare headers for forcing file download
	header('Content-Type: application/octet-stream');
	header('Content-Length: ' . filesize($local_filename));
	header('Content-Disposition: attachment; filename="' . basename($filename) . '"');


	// init cURL
	$ch = curl_init();

	// read file from public URL
	curl_setopt($ch, CURLOPT_URL, $public_filename);
	curl_setopt($ch, CURLOPT_RETURNTRANSFER, true);
	curl_setopt($ch, CURLOPT_CONNECTTIMEOUT, 500);

	// limit download speed (in bytes per second)
	curl_setopt($ch, CURLOPT_MAX_RECV_SPEED_LARGE, $speed);

	// stream data in realtime, instead of locally download before finally delivery
	curl_setopt($ch, CURLOPT_WRITEFUNCTION, function ($curl, $data) {
		echo $data;
		return strlen($data);
	});

	// perform "cURL-query"
	curl_exec($ch);

	// close cURL session
	curl_close($ch);
}
CONCLUSION
Speed limitation for file downloads is quick and easy to implement using the cURL library. All that is necessary is to configure cURL correctly.
In our sample project, it is currently also possible to access downloads directly using their public URL. This is necessary for the internal download via cURL, since cURL is essentially functioning as a proxy here. In practice, however, the possibility of direct access should be prevented. Assuming that the server has a static IP address, it is possible to place an .htaccess in the “downloads” folder, for example, which would only allow the server to be accessed using the server IP address (alternatively, vHost-Config could also be used).
Here is an example of this kind of .htaccess file (in this case, 188.65.77.77 would be the IP of the server on which the application is running):
Deny from all
Allow from 188.65.77.77
This would ensure that the application could access the public URL for the purposes of internal downloads, but that no other users would have access. It would also be possible to load the files from a remote server, and that the meta-information (such as file size) could be obtained from a database.
The two linked dummy download files could be obtained via the Anexia Network Map or alternatively, directly via these links, among other options: 100MB and 1GB (via the DATASIX datacenter).
We have been working with the CodeIgniter framework in this tutorial because it is very easy to understand and requires almost no training time. In principle, however, any framework could be used, for example Laravel or Zend.